Showing posts with label TPT products. Show all posts

Tuesday, December 31, 2013

Common ISN Pages and Components

Ok, this will be short and sweet, and pic-heavy. 
I just wanted to share some of the most common parts of my students' ISNs. 

First, our scavenger hunt page. We do a LOT of scavenger hunts. So here's how we set up our page. Most scavenger hunts I make are 10 questions since it's few enough to keep it competitive, but long enough to provide the needed practice. They use the list of letters at the top as a checklist, put the letter in the small box, and show their work in the larger box. We fold the paper into twelfths to get this setup. 


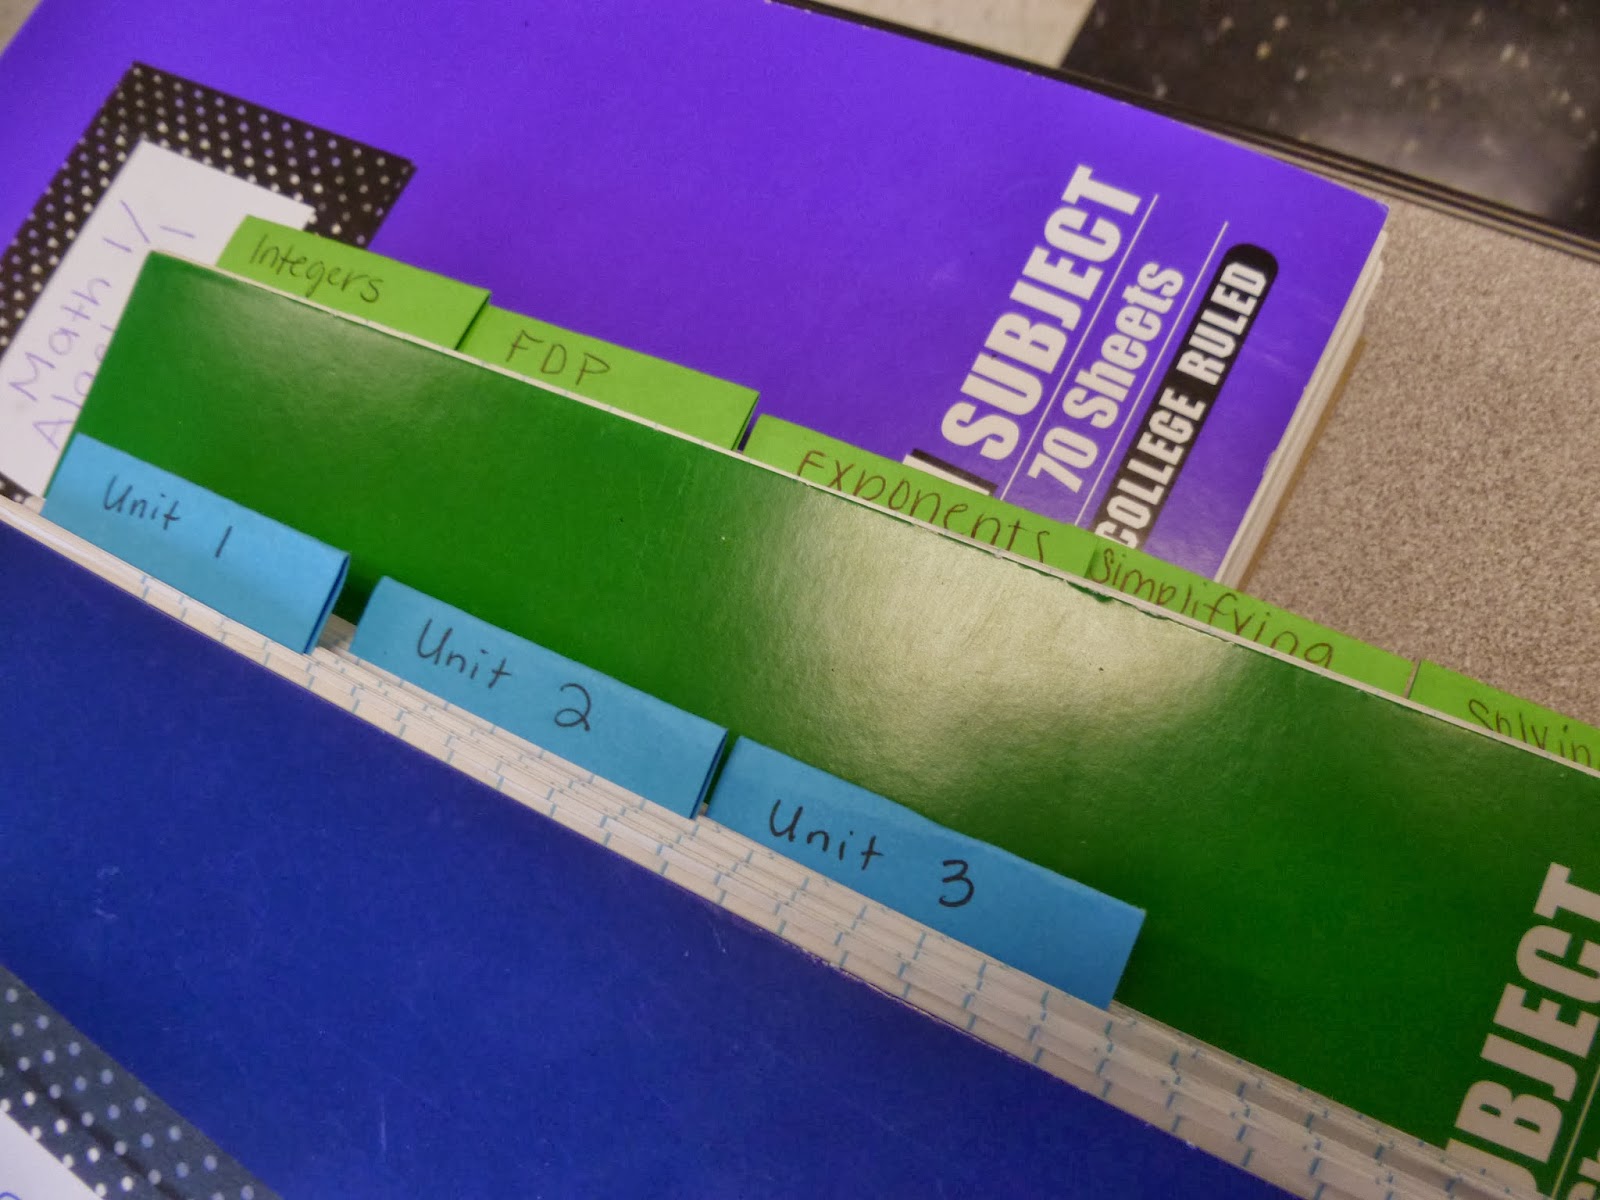
Next, our table of contents: each unit's first page is a highlighted number, and is also the location of a tab. 

As you can see, I've labeled tabs both by unit and by topic. I prefer by topic. I simply cut 2 inch squares using my paper cutter, and pass them out at the beginning of a unit. We fold them in half and then tape them in.
Next, I wanted to show you another COMMON page in all notebooking. A normal, fill-in-the-blank worksheet. I'm including this only to show that not every page is going to look like something off of Pinterest. Really. And it shouldn't. Our students need a bit of diversity in their learning, and worksheets can provide that! The one pictured is my guided-notes version of the syllabus. They fill in the notes based off of
my first-day-of-school Prezi


What's a way to make a worksheet a LITTLE bit prettier? A pocket! Just cut a piece of paper into fourths!

Lastly, I just wanted to show that not everything goes into our interactive notebooks. Student tests I keep filed away. Their quizzes and warmup papers are kept in their math folder, shown below. 

In the center of the folder are reference pages, such as the class syllabus, calculator and formula reference pages, and their tracking pages for their grade, minute drills, and skill mastery. 

Warmup Sheet up close - this is my answer key. They have to show work. 
You can buy this page from my TPT store. It lasts each student all week long, and I count it as a quiz grade. 

Minute drill tracking sheet - see my previous post on this

More pages to come soon!


Well, hello again!

We all know that Christmas and Summer Break are really the two times of the year that teachers can actually catch up on things. That means I've finally been up-to-date on the laundry, grading, planning, and several DIY projects. (Not ahead, mind you. Just up-to-date. I'm not some sort of miracle worker.)

My sister just graduated with her elementary ed degree in FL, and will be long-term subbing in a few days in Kindergarten. So naturally I've been pinteresting (I'd say pinning but it's been mostly just browsing) for some younger-ed stuff. It's really gotten me thinking about some of the things I do so similarly to elementary ed with my high school students. My mantra for the interactive notebooks has been that if a kindergartener would enjoy it, so would a high school student. So I've been thinking lately about centers and other such common elementary practices that sort of fade out of education as students progress to higher grades. I want to bring some of that back to my classroom. I saw yesterday on this blog post how a teacher used 4 standard groups each day to go through routine math practice after a mini-lesson. I love this format! I'd love some suggestions from those of you that use centers in secondary - how do you keep kids accountable? What are each of your groups used for? Break it down for me - I really want to make this work for my students!

I'm also about to post my ISN pages for all 3 preps - so be on the look-out for those. The plan is to post by topic, to make it easier for you to keep track of, rather than uploading all the pics into one huge post. Before we get there, I'd like to show you a couple of general organization pics and room updates first. 


Ok #1 is my bragging rights cabinet. Here, any time a student is proud of something (A on a test, great behavior, fast time for a math fact drill, etc.) they decorate an index card and post it for all to see. This was a picture from about 2 weeks into the semester. Right now, it's covered with over a hundred cards.


This is my "What I Respect" window - I saw this somewhere out there on the internet and couldn't find the link, but I LOVE being able to refer back to this both when giving corrections and when praising a student. It also serves as a great reminder to me of how I want to help students become better people. This actually covers 2 full window frames. Some of the words/phrases include the following: effort, dedication, perseverance, hard work, honesty, integrity, professional attitudes, encouraging words, persistence, and going above and beyond.


Here's my I Can board - just a large photo frame from a garage sale, with 4 pieces of scrapbook paper behind the class. Each class is a different color, and I just use a dry erase board to update this for each new lesson. It's hung using a command hook.


First let me say, I have NEVER had a word wall. The closest thing I've had in the past was posters with vocabulary (You know the ones I'm talking about math teachers). Nevertheless, a word wall became a requirement for all teachers in my school district this year. I came THIS CLOSE to just buying and printing one of these off of TPT. They would have been cute, simple, and would have served my needs. But then I decided that I wanted to BUILD my word wall with my students over the course of the semester. And I had a huge, blank wall. So I hot-glued (shhhh) some purple scrapbook paper up, made some letter labels, and as the semester went on, added words for each class using their class color (blue for Algebra 2 and so on.) It took maybe 10 minutes to actually put up, maybe another ten to make and print the labels. 

Ok, on to some organization! I just wanted to quickly share how I organize the MOUNTAINS of paperwork in a secondary math classroom. 

First, I have a bin for each class in the back of the room. Here's my algebra bin below. In the front, student files that hold their tests, retests, behavior documentation, homework no-credit slips, and semester-summary pages (each six weeks I have them list out each test grade, each quiz grade, and label which ones were retested and which ones were eligible for retest but not retested). 

Behind the student files, I have folders labeled 1-100. These correspond to their ISN pages, and when a student is out, they just visit that file number to get the supplies to make up their missed work. 


Next, we have my teacher files. In front (the purple files) are classroom management masters, templates, and non-content related files. Behind that, I sort all of my master copies by topic. I group the topics by very broad ideas such as "Pre-Algebra Basics," "Linear Functions," or "Systems of Equations and Inequalities." Then within each group, there is one file folder per topic. So under systems, I have a folder for graphing, substitution, elimination, word problems, linear programming, non-linear systems, and systems in 3 variables. There's also a folder in teal at the back of each group for any study guide or multi-topic review pages. I keep ISN pages in these folders, ideas for pneumonic devices, worksheets, games, centers, and even notes to myself to include certain sub-topics.  It makes it so easy to share topics with other teachers in my department - I can just hand them that topic's folder, and let them copy whatever they want! I also keep my files electronically sorted the same way - by topic grouping, and then by individual topic. 


I keep my tests and quizzes in binders, with a tab for each unit. Since these usually change year-by-year, they end up in the "review" section of the topic groupings, so I can still pull questions from them during review games. 

Thursday, September 12, 2013

OCD Makes Me Get Crafty

I love using color on everything. It's actually one of the things that got me started using interactive notebooks. But it's so much fun to just make something your own. So I do. A lot of things. All the things!!
(J.K. In reality, I'm a teacher. So I only have time to make things pretty maybe five minutes per week. Luckily for me, I had a hubby willing to help me put these together before classes started.)

I wanted an easy way for students to access art supplies, but I didn't want to keep markers and such in their group bins. I like to keep the bins at a supply minimum. Just tape, scissors, gluesticks, and one highlighter and dry erase marker per kid. As is, they get jumbled up and disorganized on a regular basis anyway. We have to do "Bin Rehab" every Friday afternoon so that the little bits of STUFF gets thrown out. (We also play Magic Trash every Friday - great idea from Teacher Tipster. See the video here of how to play). 


So I wanted a way to sort my markers and pens and extra highlighters. Here are a couple of the ideas that I considered:


1. Just using bins in my cabinet like last year. After all, it wasn't that bad to just put the bin out and have a horde of students come up to all grab what they needed. 


2. Using a wine rack and cups - I saw it on Pinterest, and it looked great, but I didn't want to buy a wine rack and a bunch of clear cups to use. (I'm super cheap like that)


3. Making one of those recycled aluminum can caddies with the pretty scrapbook paper and the perfectly sorted markers. But I thought it would take too long to save the cans. We don't eat very much out of cans around my house. Plus, the thought of having to clean the cans, save them, then decorate them annoyed me


NOT TO MENTION - every tutorial I've seen shows like 12 markers per can or cup. And let me just be the first to say...COME ON. That is NOT realistic in my world. My classes couldn't share 12 markers if their lives depended on it. I'm not sure they could share 12 markers if the fate of the universe depended on it. Last year, I had classes of 30-35. This year, it's fewer, but only slightly. So I needed a solution that would hold at least 25 markers per cup. So that MOST can have their own. It just makes things better. (And yes, I buy these myself when they're on sale during August.)


Here's what I came up with: 


I bought a PVC pipe (4in diameter) and had my husband saw it up into 6-in. sections. This was the pile once he finished:


LOTS of raw edges, but for the most part they were the same size. I covered up the top edge with washi tape, to make them more user-friendly. A couple really bad spots got a small strip of duct tape under the washi tape as well. 


Then I wrapped them in decorative packing tape that I found for $1 in the clearance bin at Michaels.

After I had 4 sections that were wrapped in the packing tape, I taped the four together with black duct tape. This part took a bit of creativity to keep them all together while taping, but I figured out that if I connected each section to the adjacent section on the bottom, it made them much more secure. (See the third picture below.)


I also put a small strip of washi tape between adjacent sections on the top, which also helped make the unit more sturdy.


And here's that final product again - They work great. 


I even made labels, before I realized that the windowsill was the perfect place for these, and that the back sections wouldn't have labels.  (If you want them, you can get them here.)

Well, it's time for me to head back to school. We're playing our rival tonight!

Wednesday, September 11, 2013

Back into the swing of things

Today's really the first day that I've felt really back into the rhythm of school. Which is really ridiculous, since today was an awkward schedule (assembly day) and nothing seemed to go right, but maybe that's what made it seem normal. I wanted to post some of my pictures of my new room, just so you can see what I've been up to. 


This is what I arrived to the first workday - empty space and lots of boxes. I'm math department chair this year, so I got the privilege of unpacking all the math supplies for our brand new school. I also had to engrave 120 calculators - which took FOREVER. 

 Ok - this is the view from the door, and this is pretty close to what it looks like today, although I've since added scrapbook paper onto the cabinet for our "Bragging Rights" wall. 

I LOVE LOVE LOVE my graphing wall! I'll post an in-depth tutorial on how I made this, but I love it and it's great to be able to reference this during lessons, and I can't wait to use it for centers this year!

Envelopes for my three classes Mastery Skill Levels - see my previous post here
Each class has different topics, and I'll post the new lists, as well as templates for the envelopes (yes I made them myself) and the number labels. 

Back corner - bins from the dollar store that hold game supplies (dice, player markers, etc), erasers for the dry erase sleeves, and index cards. 

So now I just wanna brag - we got CHARGING calculators!!!! No more batteries!!!

Did I mention the color screens and the app for mixed number operations?!?!
Even my math-hater students have been geeking out over these calculators! 

Back wall, where I post grades, and the bins where I sort their ISN page materials and student files.

Laminated color cardstock taped together = dry erase table of contents for each subject!

Each class has 2 bins. One has files labeled 1-100 for their ISN page materials. Since I do a new ISN each 6 weeks, we don't get past 100 pages very often. The other bin is for their student files, where their tests and quizzes and SBG materials are kept.

Dry erase markers, highlighters, markers, and pens all sorted by color. 
This is also where I keep the bins for their ISN supplies (stacked at the end of the day). Each group gets 1 purple bin and 1 silver bin, which stack inside one another. The purple one holds scissors/gluesticks/etc for each group member, and they use the silver one for trash, then empty it at the end of class. 

This is my system for papers that they turn in - each bin has 3 folders, one for each subject area.

Absent kid system - they get a small paper out of their class's envelope that states what pages they missed and if there's anything outside of the notebook to make up. 


Phone prison - this is just the bottom half of a show organizer that I cut up, then covered the raw edges with black tape. 


For open house, this was on the board as the parents walked in - all I did was write supplies on post-its, and replenish as it grew low (I had some generous parents this year!)

Primary Board - this has since changed to a vertical setup, since it gave me more room to write the warmup. 
I give 3 warm-up questions per day, and the students respond on a weekly page that I collect as a quiz grade at the end of the week. This is also where I check their homework and give them a stamp on their punch pass. The warm-up sheet is available here
The labels on the board are also available for free in black and white, but they're easy to edit in word to be colorful. 


Let me know what you think!!

Monday, August 5, 2013

Classroom Decorating

Wow it's been quite a week. I was at the Meredith Math Institute learning about how to create rigorous math tasks for Math 1 students - lots of good stuff there. If you teach Math 1, 2, or 3, check out this google group: it's free to join, and we have posted all of the tasks from the week. 

https://groups.google.com/forum/#!forum/navigating-seven-seas

Right before I left for Raleigh, I had a chance to go school supply shopping and pick up my class decor stuff - fabric and bins and such. I'll post pictures once I get my room set up (this morning was the first morning we could access our rooms), but for now, this should give you a decent idea. 


Most of the fabric I found in the clearance section of Walmart, and together for 1-2 yards of each, it was around $15.  

I am so in love with that purple batik! I'm also super happy to have two of the same pattern but in a dark and light version. One of those two will become my curtains for my room. 

The solid colors will be used for the bulletin boards - I love being able to reuse them year after year, and they don't fade like the butcher paper does. My boards are across from the window, so that was a definite concern this year. 

I have 3 preps this year, so everything will be color coded in these 3 colors. Blue = Algebra Two (see what I did there? HAHA), purple = Algebra 1/Math 1, and green is foundations. I need a pneumonic device for those second two. (My hubby suggested "purple is for derples," but I don't think that will work.)

The ribbon will be woven around the crates. (An idea I found on Pinterest)  One of the great things about Walmart is I can get everything in the same colors, since they're made by the same company. The ribbons, fabric, boards, and crates match almost perfectly!

While we're color coding, I also made these contact cards to put in the front of their interactive notebooks. It has my website, google voice number, and email both in print and as QR codes. 

Download the template for free here. 
I used the website http://www.the-qrcode-generator.com/ to come up with the QR codes. 

I also made these supply labels - download the free template here

That's it for now - coming soon: pictures of last year's Math ISN.